Have you ever walked into the laundry room, excited to finally finish your laundry, only to find that your dryer has stopped working? That was exactly what happened to me one evening, and it couldn’t have come at a worse time. With a mountain of clothes to dry, I panicked. However, instead of calling an expensive repairman, I took matters into my own hands. To my surprise, the fix was simpler than I thought, and it only took a few hours to get my dryer back in action.
In this blog, I’ll walk you through the exact steps I took to troubleshoot and fix my dryer. So, if you’re dealing with a malfunctioning dryer, keep reading–you may just save yourself a hefty repair bill.
Step 1: Assess the Situation
Problem:
My dryer was running, but it wasn’t producing any heat. This is a common issue, and the good news is that it’s usually easy to fix. The first thing I did was check if the dryer was still plugged in and whether the circuit breaker had tripped. This sounds simple, but you’d be surprised how often the problem lies in something so obvious.
Action:
I unplugged the dryer for a few minutes and then checked the breaker. Everything seemed fine, so I moved on to inspect other causes.
Step 2: Check the Lint Trap and Vent
Problem:
One of the most common issues I discovered with dryers not producing heat is a clogged lint trap or vent. Over time, lint can build up and block the airflow, causing the dryer to overheat and shut off automatically to prevent a fire hazard.
Action:
I cleaned out the lint trap thoroughly (it was surprisingly full!). Then I turned my attention to the vent hose behind the dryer. The hose was connected properly, but over time, lint had built up inside it, obstructing airflow.
I disconnected the vent from the dryer, then used a vent cleaning brush (or a vacuum with a hose attachment) to clean the inside of the vent. I made sure to reach as far as I could and removed as much lint as possible.

Step 3: Inspect the Heating Element
Problem:
If cleaning the vent and lint trap didn’t fix the issue, it’s time to inspect the heating element. A broken heating element is a common cause of dryers not heating.
Action:
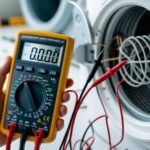
To inspect the heating element, I first unplugged the dryer and removed the back panel. I used a multimeter to test the heating element for continuity (a quick way to check if it’s working). If it’s fault, the multimeter won’t beep, showing the element needs to be replaced.
In my case, the heating element was in good condition. If yours is faulty, you can find a replacement part online or at a local appliance store. You can order a replacement element and install it by following the manufacturer’s instructions.
Step 4: Check the Thermostat and Fuse
Problem:
If the heating element is working, but the dryer still isn’t heating, the issue may lie with the thermal fuse or thermostat. These components regulate the temperature inside the dryer, and if they’re damaged, they can prevent the dryer from producing heat.
Action:
I checked the thermal fuse by using the multimeter to test for continuity. If the fuse was blown, the multimeter wouldn’t show continuity. Here, the fuse was indeed faulty, so I ordered a replacement online.
After replacing the thermal fuse, I tested the dryer again, and this time, it worked perfectly!
Step 5: Reassemble and Test the Dryer
Problem:
Once I had replaced the faulty parts, I needed to reassemble the dryer. This step involved putting all the panels back in place, reconnecting the vent hose, and plugging the dryer back in.
Action:
I reconnected everything tightly and checked that the door was closing properly. After everything was reassembled, I plugged the dryer back in and ran a test load. To my relief, the dryer was back to working like new!
Why It’s Important to Perform Regular Dryer Maintenance
While this repair was relatively simple, it’s essential to perform regular maintenance to prevent issues in the future. Clean your lint trap after every load, and ensure the vent hose is cleared of lint at least once a year. This will not only improve the efficiency of your dryer but also help prevent dangerous fire hazards.
DIY Dryer Repair Saves Money and Time
Fixing a malfunctioning dryer doesn’t have to be complicated or expensive. With a little patience and a few basic tools, you can diagnose and fix most issues yourself. From cleaning the vent to replacing a faulty thermal fuse, you can save hundreds of dollars by handling these repairs on your own.
I’m glad I took the time to learn about my dryer and solve the issue myself. Not only did I save money on a repair bill, but I also gained confidence in my ability to handle other DIY home repairs.
If you’re interested in learning more about home repairs, check out our DIY Home Repair Mastery e-book for step-by-step instructions on common repairs around the house. If you’re looking to prevent major breakdowns and keep your home in great shape, Fix It Before It Breaks is a fantastic resource that teaches you how to tackle minor issues before they turn into costly repairs.