
It’s a situation many homeowners dread: You’re in the middle of laundry day, and your dryer suddenly stops working. I found myself in this exact scenario one afternoon when I was preparing to fold a fresh load of laundry, only to discover my dryer wasn’t producing heat. I immediately thought of the cost and hassle of hiring a professional, but I took matters into my own hands. With a few simple steps, I could fix my dryer myself—and save a lot of money.
If you’re facing the same issue, don’t panic. In this guide, I’ll walk you through how I diagnosed and repaired my dryer. From checking the basics to replacing parts, you can restore your dryer and get it working again without calling an expensive repairman.
Step 1: Assess the Situation
At first glance, the dryer was still running. The drum was spinning, but there was no heat. After I checked the obvious—that the dryer was plugged in and the breaker wasn’t tripped—I had to think deeper.
The next step was to understand what could cause a dryer to run without producing heat. After some quick research, I realized that the most common causes of this problem were a clogged vent, a broken heating element, or a malfunctioning thermostat.
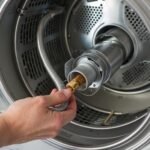
Step 2: Check the Vent and Lint Trap
The first thing I did was check the lint trap and vent hose for blockages. A clogged vent can cause a dryer to overheat and shut off the heating element as a safety measure.
I started by pulling out the lint trap and cleansing it. I also used a vacuum with a hose attachment to clean inside the vent hose, which can collect lint. After cleaning both the lint trap and vent, I reconnected the vent hose and tested the dryer. It worked! But there was still the possibility that the heating element could be broken.

Step 3: Inspect the Heating Element
Even after cleaning the vent, my dryer still wasn’t producing heat, so I turned my attention to the heating element. A malfunctioning heating element is one of the most common reasons dryers stop producing heat.
To check the heating element, I first unplugged the dryer for safety. Then, I removed the back panel to gain access to the element. I used a multimeter to test the element for continuity. If the multimeter doesn’t beep, it means the element is faulty and needs to be replaced.
Fortunately, my heating element was in working condition, but if yours is broken, you can purchase a replacement online or from a local appliance store. The process of installing a new heating element involves disconnecting the old one, removing the screws, and installing the new one in reverse order.
Step 4: Check the Thermostat and Thermal Fuse
If the heating element is intact, the next part to check is the thermostat or thermal fuse. Both components regulate the temperature inside the dryer. If either is malfunctioning, the dryer will stop producing heat.
I used my multimeter again to test both the cycling thermostat and thermal fuse for continuity. In my case, both parts were working properly. But if either part is damaged, you’ll need to replace it.
Step 5: Reassemble the Dryer and Test
After inspecting and replacing the parts, I carefully reassembled the dryer. I attached the back panel, reconnected the vent hose, and plugged the dryer back in.
I ran a test load, and to my relief, the dryer began heating again! The repair was a success, and I could get back to laundry day with no hass
Maintenance Tips to Avoid Future Problems
While fixing my dryer was a relatively simple process, it’s important to maintain your dryer to prevent future issues. Here are a few maintenance tips that I now follow to keep my dryer running efficiently:
Clean the lint trap after every load: This will prevent lint buildup and help your dryer run more efficiently.
Clean the vent hose regularly: At least once a year, use a vacuum or vent cleaning brush to remove any lint buildup in the vent hose.
Check the heating element, thermostat, and fuse periodically: If your dryer isn’t heating properly, these components may need to be checked.
A Quick and Affordable DIY Fix
Fixing a broken dryer doesn’t have to be a daunting or expensive task. With a little patience, the right tools, and a few basic steps, you can repair your dryer on your own and avoid costly repair bills. Whether it’s a clogged vent, a broken heating element, or a faulty thermostat, dryer issues are easy to fix with a little DIY knowledge.
If you’re interested in learning more about fixing appliances or other home repairs, check out our Fix It Before It Breaks e-book, which is packed with helpful tips for maintaining your home appliances. You can also find more detailed home repair guides in our DIY Home Repair Mastery e-book, which covers a wide range of common home repairs.