Cracks in drywall are a common issue in homes, whether caused by settling, humidity, or general wear and tear. Although repairing drywall cracks may seem like a daunting task, it’s actually a straightforward DIY project you can tackle on a weekend. With the right tools and materials, you can repair drywall cracks like a professional, saving both time and money. In this guide, we’ll walk you through the process of repairing drywall cracks, step by step, so you can restore your walls to their former glory.
Why Drywall Cracks Happen
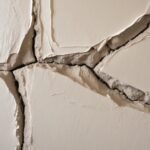
Before jumping into the repair, it’s helpful to understand why drywall cracks occur. Some of the most common causes include:
House Settling: Over time, your home may settle, leading to small cracks along seams, joints, or corners.
Moisture: High humidity or water leaks can cause the drywall to expand and contract, leading to cracks.
Temperature Changes: Sudden shifts in temperature can cause the materials in your home to shift, resulting in hairline cracks.
Impact: Furniture being moved, or accidental bumps, can cause minor cracks in your walls.
Now that we know why cracks happen, let’s dive into how to fix them.
Tools and Materials You’ll Need
Before you begin, gather the necessary tools and materials. You can find most of these items at your local hardware store.
Joint compound (also called spackle)
Putty knife (4-inch or 6-inch)
Drywall patch (if the crack is large)
Primer and paint (to finish the repair)
Sanding block or sandpaper
Tape measure
Utility knife
Paintbrush (for touch-ups)

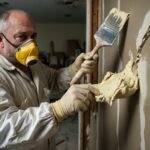
Step 1: Prepare the Area
The first step in repairing drywall cracks is to prepare the area. Here’s how to get started:
Clean the Crack: Use a utility knife to cut along the crack, removing any loose or flaking drywall around the edges. This ensures the joint compound has a clean surface to adhere to.
Widen the Crack (if necessary): If the crack is wide, use the utility knife to widen it slightly. This allows the compound to fill the gap more effectively and creates a better surface for the patching material to adhere to.
Smooth the Edges: After cutting, gently sand the edges of the crack to smooth out any rough or jagged areas. You want the edges to be as smooth as possible for the compound to create a seamless finish.
Step 2: Apply Joint Compound
Once the area is prepared, it’s time to apply the joint compound (also called spackle) to fill in the crack. Here’s how to do it:
For Small Cracks: If the crack is less than 1/4 inch wide, use a putty knife to apply a thin layer of joint compound directly into the crack. Press firmly to ensure the compound fills the crack completely.
For Larger Cracks: If the crack is larger than 1/4 inch, you’ll need to apply a drywall patch first. Cut a piece of drywall patching mesh (available at any hardware store) and adhere it over the crack. Then, apply a thicker layer of joint compound over the patch, smoothing it out with your putty knife. You’ll need to build up the compound in layers, allowing each layer to dry before adding the next one.
Pro Tip: Apply the compound evenly and smoothly. This will save you time during the sanding process and ensure a professional-looking finish.
Step 3: Allow the Compound to Dry
After applying the joint compound, allow it to dry completely. Drying times will vary depending on the thickness of the compound and the temperature of your home. Typically, it takes 4 to 6 hours for the compound to dry to the touch.
Once it’s dry, you can check to see if you need to apply a second or third coat. If the first layer didn’t completely cover the crack or if it looks uneven, apply additional layers of compound, allowing each layer to dry before applying the next.
Step 4: Sand the Area
After the joint compound is fully dry, it’s time to sand the area smooth. Use a sanding block or sandpaper to smooth the surface gently. Be sure to sand in a circular motion and avoid pressing too hard, as this can create gouges in the compound.
The goal is to create a smooth, even surface that blends seamlessly with the rest of the wall. You can use a damp cloth to wipe away any dust created during sanding.
Step 5: Prime and Paint
Once the patched area is smooth, it’s time to apply primer and paint. Follow these steps to finish the repair:
Apply Primer: Use a paintbrush to apply a coat of primer over the repaired area. The primer helps the paint adhere better and ensures full patch coverage. Let the primer dry for about 1 hour.
Paint the Wall: After the primer has dried, apply the matching wall paint. Depending on the color of your wall and the texture of the compound, you may need two coats of paint. Allow each coat to dry before applying the next.
Pro Tip: If the repaired area is noticeable after painting, you can lightly sand the painted surface after it dries to smooth out any visible ridges.
Step 6: Final Touches
Once the paint is dry, inspect the area for any imperfections. If needed, apply a light touch-up coat of paint or compound. Be sure to clean up your tools and remove any dust or debris from the area.
Now you’re done! Your drywall crack is repaired, and the wall looks good as new.
Repairing drywall cracks doesn’t have to be complicated or expensive. With a few simple tools and materials, you can tackle the project yourself and restore your walls to their original condition. By following these steps, you’ll not only save money on professional repairs but also improve the overall look of your home.
For more detailed DIY home repair guides, check out Fix It Before It Breaks for more tips on preventing common issues in your home. If you’re looking for more home improvement inspiration, DIY Home Repair Mastery is packed with easy-to-follow instructions for tackling many home repairs.