A leaky pipe under the sink is a common issue in many households, and if left unchecked, it can lead to serious water damage, mold growth, and higher water bills. The good news is that repairing a leaky pipe is often a straightforward DIY task you can tackle in just a few minutes. In this guide, I’ll walk you through the simple steps to fix a leaky pipe under the sink, providing you with the tools, knowledge, and confidence you need to get the job done.
By following this Fix It Fast Leaky Pipe Guide, you’ll be able to address the issue quickly and efficiently, saving both time and money. So, let’s get started on solving your plumbing problem!
Why Do Pipes Leak Under the Sink?
Before jumping into the repair process, it’s important to understand the common causes of leaky pipes under the sink. These leaks can occur for a variety of reasons, including:
Loose Pipe Connections: Over time, pipe fittings can become loose, allowing water to leak out.
Worn-out Washers: The rubber washers or gaskets inside the pipe connections can deteriorate, leading to leaks.
Corroded Pipes: Old, rusty pipes can develop holes or cracks, causing water to escape.
High Water Pressure: Excessive water pressure can stress the pipes, causing joints or fittings to loosen or burst.
Understanding the root cause of the leak is essential for fixing it properly and preventing it from happening again in the future.
Tools and Materials You’ll Need
Before you repair the leaky pipe, gather the following tools and materials. These are the essentials for a fast and effective repair:
Adjustable Wrench: For tightening or loosening pipe fittings.
Pipe Sealant or Epoxy Putty: For sealing minor leaks or cracks in the pipes.
Replacement Washers: If the leak is because of a worn-out washer, having a spare will make the repair faster.
Plumber’s Tape: To ensure a tight seal on threaded connections.
Bucket or Towels: To catch any water that spills out when you disconnect the pipes.
Rubber Gloves: For hygiene and protection when working with water and plumbing.
Recommended Products:
Adjustable Wrench: Find it here on Amazon
Epoxy Putty for Pipe Repair: Buy it here on Amazon
Step-by-Step Guide to Fixing a Leaky Pipe Under the Sink
Step 1: Turn Off the Water Supply
The first thing you need to do is turn off the water supply to the sink. This is a crucial step to prevent more water from leaking and to ensure your safety while working on the pipes. You can usually find the shut-off valves under the sink, close to the wall. Turn both the hot and cold water valves clockwise to stop the flow of water.
Once the water is turned off, turn on the faucet to drain any remaining water from the pipes. This will make the repair process much easier and cleaner.
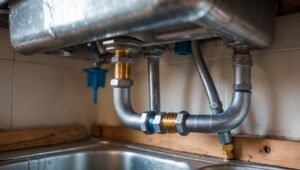
Step 2: Clear the Area Under the Sink
Before you work on the pipes, clear the area under the sink. Remove any items stored in the cabinet to give yourself enough space to work. Place a bucket or towels on the floor to catch any water that might spill out when you disconnect the pipes.
Step 3: Inspect the Leaking Pipe
Now that the area is clear, inspect the leaking pipe. Depending on the type of pipe (PVC, copper, or flexible hose), the source of the leak could vary. Look for the following common causes:
Loose connections: If the fitting where the pipe meets another pipe or fixture is loose, you’ll likely see water dripping from that area.
Damaged pipe: Look for cracks or holes in the pipe itself, which may cause the leak.
Worn-out washers or seals: If the leak is coming from a joint, the rubber washers inside the fitting may need to be replaced.
Once you’ve identified the source of the leak, you can move forward with the fix.
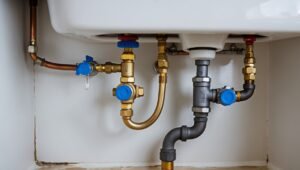
Step 4: Tighten Loose Connections
If the leak is caused by a loose connection, grab your adjustable wrench and tighten the fitting. Be careful not to over-tighten, as this can damage the threads or the pipe. If tightening doesn’t stop the leak, you may need to remove the fitting completely and replace the washer or seal inside.
Step 5: Replace Worn-out Washers
If the leak is coming from a worn-out washer, the fix is fairly simple. You’ll need to:
Use the adjustable wrench to disconnect the pipe fitting.
Remove the old washer or seal and replace it with a new one of the same size.
Reassemble the pipe and tighten the connection.
Tip: When installing a new washer, apply a small amount of plumber’s tape to the threads to ensure a tight, leak-proof seal.
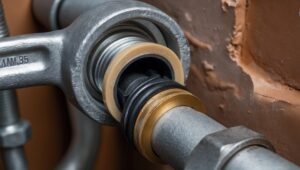
Step 6: Seal Minor Cracks with Epoxy Putty
If you discover a small crack or hole in the pipe itself, you can seal it temporarily using epoxy putty. This is a quick fix that works well for small leaks. Here’s how you can use it:
Clean the area around the crack to remove dirt and debris.
Knead the epoxy putty until it’s soft.
Apply the putty directly to the crack, pressing it firmly to ensure it bonds well with the pipe.
Allow the putty to cure for the time specified on the package (usually 1-2 hours).
This method works well for small leaks, but it’s important to note that it’s a temporary solution. If the crack is large, you may need to replace the damaged section of pipe.
Step 7: Turn the Water Back On and Test the Repair
Once you’ve completed the repair, turn the water supply back on and check for leaks. Slowly open the faucet and watch the area where you made the repair. If the leak persists, double-check the connection and make sure everything is properly tightened.
If the leak stops, congratulations! You’ve successfully repaired the leaky pipe under your sink.
Prevent Future Leaks
To prevent future leaks, here are a few tips you can follow:
Regularly inspect your pipes: look under your sink every few months to ensure everything is secure and free of damage.
Use high-quality materials: When replacing washers or pipes, always use high-quality materials to ensure a long-lasting repair.
Keep your water pressure in check: High water pressure can stress your pipes and cause leaks. If you suspect high water pressure, install a pressure regulator.
Finally
Fixing a leaky pipe under the sink is a quick and simple DIY task anyone can handle with the right tools and materials. By following these steps, you can save money on plumbing services and prevent water damage in your home. Whether it’s a loose connection, a worn-out washer, or a small crack in the pipe, you now know how to tackle these issues in under 15 minutes.
For more helpful DIY plumbing tips and projects, be sure to check out our premium DIY books:
DIY Home Repair Mastery Find it here
The DIY Plumbing Fixes Guide, Get your copy here
With a little know-how, you’ll be able to handle any plumbing issue that comes your way and keeps your home running smoothly.