
An overheating engine is one of the most common and stressful issues that car owners face. But before you panic and call a mechanic, know that there are several things you can do yourself to identify and solve the problem, saving you from expensive repairs. In this blog, we’ll walk you through the steps to diagnose and fix an overheating engine, focusing on simple solutions with no need to replace major components.
Step 1: Understanding the Signs of an Overheating Engine
The first step in fixing an overheating engine is to recognize the signs. Here are a few symptoms to watch out for:
The temperature gauge on your dashboard moves into the red zone or stays near the “H” (hot) mark.
Steam or smoke coming from under the hood.
Unusual noises, such as a loud, sizzling sound as the engine works harder to cool itself down.
If you notice any of these signs, it’s crucial to shoot to prevent severe engine damage. Sometimes, the issue may be minor, such as low coolant levels or a clogged radiator.
Step 2: Check the Coolant Level
One of the most common causes of an engine overheating is low coolant levels. Coolant (also called antifreeze) regulates the engine’s temperature by absorbing heat and circulating it through the radiator. If the coolant level is low, the engine won’t be able to cool itself properly.
How to Check and Add Coolant:
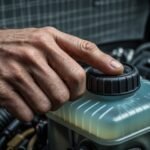
Wait for the engine to cool: Never open the coolant reservoir when the engine is hot—hot coolant can cause burns.
Locate the coolant reservoir: It’s typically a translucent tank near the radiator.
Check the level: If the coolant is below the minimum line, it’s time to top it up.
Add coolant: If the level is low, add a 50/50 mixture of antifreeze and water to the reservoir. Be sure to use the right coolant type for your vehicle.
Pro Tip: Always use coolant that is compatible with your vehicle’s make and model. If you’re unsure, refer to your car’s manual or ask an auto parts store associate.
Step 3: Inspect for Coolant Leaks
If the coolant is low, there could be a leak somewhere in the system. To check for leaks:
Look for puddles or stains under the car. These could show a coolant leak from the radiator, hoses, or water pump.
Inspect the radiator hoses: Check for cracks or bulges. A damaged hose might leak coolant, causing the engine to overheat.
Examine the radiator cap: A faulty or loose radiator cap can cause coolant to escape. Ensure the cap is tight and in good condition.
If you find a leak, replace the damaged part immediately. You can purchase replacement hoses or a new radiator cap from your local auto parts store or online.

You can get a radiator hose replacement kit on Amazon, perfect for DIY repairs.
Step 4: Check the Radiator for Blockages
Another common cause of overheating is a clogged radiator. Over time, dirt, debris, and rust can accumulate in the radiator, preventing coolant from flowing freely and effectively cooling the engine.
How to Clean a Clogged Radiator:
Turn off the engine and allow it to cool completely.
Locate the radiator at the front of the engine bay.
Use a hose to flush out any debris from the front of the radiator. Make sure the water flows through it properly.
Check for obstructions: If there’s a lot of dirt or debris stuck in the fins, use a soft brush to clean them.
If cleaning doesn’t resolve the issue, the radiator itself might be damaged or clogged internally, and replacement might be necessary.

For a high-quality radiator cleaner and flush kit, check out this product available on Amazon.
Step 5: Test the Thermostat
If the coolant level and radiator are fine, the problem may be a faulty thermostat. The thermostat regulates the flow of coolant through the engine. If it’s stuck closed, the coolant won’t circulate properly, leading to overheating.
How to Check the Thermostat:
Start the engine and let it run for a few minutes.
Feel the radiator hose: If the hose doesn’t get warm after a few minutes, it could show a stuck thermostat.
Test the thermostat: To confirm its fault, you can remove it and place it in a pot of hot water. If it doesn’t open as the water heats, it’s time for a replacement.
Replacing the thermostat is a simple DIY job and doesn’t require professional help.
Step 6: Check the Water Pump
The water pump circulates coolant through the engine. If it’s malfunctioning, it can cause the engine to overheat. Signs of a failing water pump include coolant leaks around the pump, strange noises, and an overheating engine.
How to Replace a Water Pump:
Drain the coolant from the radiator.
Locate the water pump: It’s usually at the front of the engine, driven by the timing belt or serpentine belt.
Remove the old pump: Loosen and remove the bolts, then install the new pump.
Refill the coolant and check for leaks.
Need a reliable water pump replacement kit? This kit on Amazon includes everything you need for a DIY fix.
Step 7: Final Steps and Testing
After checking and fixing all the potential issues listed above, it’s time to test the car. Start the engine and monitor the temperature gauge. If the engine stays at a safe temperature and the overheating warning doesn’t come on, you’ve successfully fixed the issue!
Finally
Overheating engines is stressful, but with the right steps and knowledge, you can resolve the issue without spending a fortune at the mechanic. Regular maintenance, such as checking coolant levels, cleaning the radiator, and testing the thermostat, will help prevent overheating from becoming a recurring issue.
If you continue to experience problems, or if you’re unsure about certain repairs, consider consulting a professional. But mostly, these simple DIY fixes should get you back on the road in no time!