A failing fuel pump is one of the most common issues for car owners, and it’s often a cause of poor engine performance. If you’re ready to step up your DIY skills and save some money, replacing the fuel pump can be a manageable task. This guide will walk you through how to diagnose fuel delivery issues, test the fuel pressure, safely drop the gas tank, and install a new fuel pump.
Step 1: Identifying Fuel Delivery Issues
The first step in diagnosing a failing fuel pump recognizes the symptoms of a fuel delivery issue. Common signs that the fuel pump may be on the fritz include:
Engine sputtering or stalling while driving
Difficulty starting the engine, especially when hot
Loss of power during acceleration
Whining noise coming from the gas tank area (a failing fuel pump often makes a distinct high-pitched sound)
If you’re experiencing any of these issues, it could show a problem with the fuel pump or the fuel delivery system.
Diagnostic Tools You’ll Need:
Fuel pressure gauge (to test fuel pressure)
Scan tool (for troubleshooting codes)
Multimeter (for electrical checks)
To get the right tools for the job, check out our Essential Car Repair Tools Checklist.
Step 2: Testing Fuel Pressure
Before replacing the fuel pump, it’s essential to test the fuel pressure to confirm that the pump is indeed the issue. Here’s how to do it:
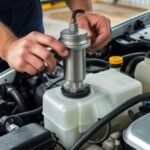
Locate the Fuel Pressure Test Port: This is usually near the fuel rail, and it’s a small valve where you can attach the fuel pressure gauge.
Attach the Fuel Pressure Gauge: Connect the gauge to the test port, following the manufacturer’s instructions.
Turn the Key to the On Position: Without starting the engine, turn the key to the “on” position. This will activate the fuel pump and allow the gauge to measure the pressure.
Compare the Reading to Manufacturer Specifications: Most vehicles have a pressure range specified in the service manual. If the pressure is too low, it’s a sign the pump isn’t delivering fuel properly.
If you’re new to using a fuel pressure gauge, check out our Step-by-Step Fuel Pressure Testing Guide for additional details.
Step 3: Dropping the Gas Tank Safely
Dropping the gas tank is necessary to access the fuel pump. Safety is the top priority when working around gasoline, so follow these steps to ensure a safe and smooth process:
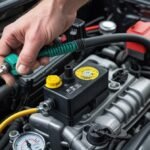
Disconnect the Battery: To avoid any sparks, always disconnect the car battery before working near the fuel system.
Drain the Fuel Tank: If the tank is full, carefully drain the fuel into a safe container. You can either siphon the fuel out or use a pump.
Lift the Vehicle: Use a jack and jack stands to raise the car safely. If you have a car ramp, this can be a helpful alternative.
Disconnect Fuel Lines: Use pliers or a fuel line disconnect tool to remove the fuel lines from the tank. Be prepared for some residual fuel to spill, so have rags and a catch pan ready.
Unbolt the Tank: Use a wrench to unbolt the straps holding the tank in place. With the help of a second person, carefully lower the tank.
To ensure a safe process, download our Gas Tank Removal Safety Guide.

Step 4: Replacing the Fuel Pump
Remove the Old Fuel Pump: Once the tank is lowered, locate the fuel pump assembly. Most times, you will need to remove the keep ring or bolts securing the pump to the tank.
Disconnect Electrical Connections: Carefully unplug the electrical connector to the pump, ensuring there are no sparks or shorts.
Install the New Fuel Pump: Place the new fuel pump into the assembly and secure it with the keeping ring. Check that the pump is seated correctly and that the electrical connection is tight.
Reassemble the Gas Tank: Once the new pump is installed, reverse the steps for reattaching the fuel lines and securing the tank back into place.
Reinstall the Fuel Tank: With the help of a second person, lift the tank back into position and bolt it securely.
Pro Tip: install a new fuel filter along with the pump, as a clogged filter could cause the problem and affect the performance of the new pump.
Step 5: Testing the New Fuel Pump
Reconnect the Battery: Reconnect the battery and turn the key to the “on” position. You should hear the new fuel pump running for a few seconds.
Start the Engine: Once you’ve confirmed the pump is primed, start the engine. If it starts without sputtering, the fuel pump is working as it should.
Check for Leaks: Inspect the fuel lines and connections for any leaks.
Check Fuel Pressure: Once the engine is running, use your fuel pressure gauge to confirm the pump is providing the correct fuel pressure.
Step 6: Reassemble the Vehicle and Test Drive
Once everything is reassembled, it’s time for a test drive. Monitor the engine performance and listen for any unusual sounds. If the car runs smoothly without stalling or sputtering, you’ve successfully replaced the fuel pump.
Need More DIY Car Repair Tips?
Check out our DIY Car Repair Ebook for step-by-step instructions on other common repairs and diagnostics!
Related Resources:
DIY Home Fixes Ebook: Learn how to repair your car and home with this comprehensive guide.
Tool Starter Kit Checklist: Make sure you have the right tools to tackle car repairs like a pro.
Printable Guides: Access downloadable guides for your car repair projects.
By following these steps, you should be able to replace your failing fuel pump with confidence, saving yourself the expense of a shop repair. If you’re looking for more in-depth guides or troubleshooting tips, be sure to check out our full library of repair resources!