An ABS (Anti-lock Braking System) warning light can be a source of concern, but understanding the issue and how to troubleshoot it can save you time and money. If you’re ready to dive in and fix it yourself, this guide will help you understand how ABS works, how to scan and interpret the error codes, test wheel speed sensors, and replace them if necessary. Plus, we’ll provide tips for dealing with stubborn rusted bolts.
Step 1: Understanding How ABS Works
The ABS system helps prevent your wheels from locking up during braking, maintaining steering control. It does so by constantly monitoring the wheel speed and adjusting the brake pressure to prevent skidding.
There are four primary components in the ABS system:
Wheel Speed Sensors: Monitor the speed of each wheel and send data to the ABS control module.
ABS Control Module: Receives input from the sensors and adjusts brake pressure to prevent wheel lock-up.
Hydraulic Control Unit (HCU): Modulates the brake pressure at each wheel based on commands from the ABS control module.
ABS Warning Light: Illuminates on the dashboard when the system detects a fault.
If the ABS warning light is on, it could be because of several issues, with wheel speed sensors being a common culprit. Let’s walk through how to diagnose and replace faulty sensors.
Pro Tip: Want to learn more about automotive systems? Check out our DIY Car Repair Ebook for a deeper dive into car electronics and systems.
Step 2: Scanning the ABS System for Trouble Codes
The first step in troubleshooting an ABS warning light is to scan the system for error codes. Here’s how you do it:
Get an OBD-II Scanner: An OBD-II (On-Board Diagnostics) scanner is essential for scanning your car’s computer system. If you don’t already have one, you can find them online or at your local auto parts store.
Connect the Scanner to the OBD-II Port: The OBD-II port is usually located under the dashboard, near the driver’s seat. Plug the scanner in and turn the car’s ignition to the “on” position.
Scan for ABS Codes: Follow the scanner’s instructions to scan for ABS trouble codes. Common ABS codes include C0035 (left front wheel speed sensor) or C0040 (right rear wheel speed sensor), but you’ll need to refer to the scanner’s code definitions for your specific vehicle.
If you’re new to reading OBD-II codes, download our OBD-II Code Reader Guide to help you understand the results.
Step 3: Testing the Wheel Speed Sensors
Once you’ve identified a potential sensor problem through the codes, it’s time to test the wheel speed sensors. Here’s a simple guide to testing:
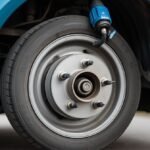
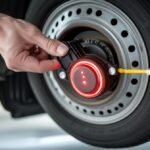
Locate the Sensors: The wheel speed sensors are usually located near each wheel hub, connected to the wheel bearing or brake rotor.
Inspect the Wiring: Check the wiring around the sensor for signs of wear, cuts, or damage.
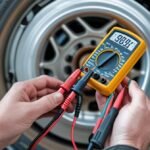
Test the Sensor with a Multimeter: Set your multimeter to the AC voltage setting and test the output from the sensor as you rotate the wheel. The voltage should fluctuate as the wheel moves. If the voltage is inconsistent or zero, the sensor may be faulty.
For a more thorough breakdown on testing sensors, download our Wheel Speed Sensor Testing Guide.
Step 4: Replacing the Faulty Sensor
If the sensor is faulty, it’s time to replace it. Here’s how you do it:
To lift the vehicle, use a jack and jack stands to ensure safety. Always secure the vehicle properly before working.
Remove the Wheel: Take off the wheel to access the wheel speed sensor.
Unbolt the Old Sensor: Use a socket wrench to remove any bolts or screws securing the sensor in place. Be gentle as the sensor may be attached to rusted parts.
Disconnect the Electrical Connector: Carefully unplug the sensor from the electrical wiring.
Install the New Sensor: Place the new sensor in the same position as the old one, and secure it with the bolts or screws. Plug the electrical connector back in.
Reassemble the Vehicle: Reinstall the wheel, lower the car, and tighten all the bolts to the proper torque.
Tip: Stubborn rusted bolts are a common issue when replacing wheel speed sensors. Use a rust remover or penetrating oil to loosen them, and always have extra bolts on hand in case they break.
For an easy-to-follow checklist during installation, download our Wheel Speed Sensor Replacement Checklist.
Step 5: Resetting the ABS Warning Light
Once the faulty sensor is replaced, you’ll need to reset the ABS warning light. Here’s how:
Turn the Ignition Off and On: After the repair, turn the ignition off for about 30 seconds, then turn it back on. Sometimes, this may reset the ABS system.
Use the OBD-II Scanner to Clear the Code: If the light doesn’t turn off, use your OBD-II scanner to clear the stored trouble codes. This will reset the ABS system.
If you’re unsure how to reset the codes, refer to our OBD-II Scanner User Guide.
Step 6: Test the ABS System
After replacing the sensor and resetting the light, take your vehicle for a test drive. Monitor the ABS warning light and check if the system functions properly. Try to test the ABS by gently applying the brakes at higher speeds to see if it kicks in.
If the light turns off and the ABS system works correctly, your repair was successful!
Additional Resources:
DIY Car Repair Ebook: Get the full guide to diagnosing and repairing car systems, including ABS.
Tool Starter Kit Checklist: Ensure you have all the essential tools for a successful repair.
Printable Guides: Access handy printable guides to keep with your car tools for easy reference during repairs.
By following these steps, you’ll have the ABS warning light off and your wheel speed sensor replaced with confidence. If you’re looking for more DIY car repair tips, be sure to explore our other repair guides and resources!